
* This blog post is an English translation of an article originally published in Japanese on February 20, 2023.
TL;DR: An introduction to the steps for running SYCL 2020 implementations on NVIDIA GPUs and a performance comparison of convolution operations.
This is Sakabe from the Solutions Division II.
Previously (in 2017), an article titled “Trying to Write OpenCL in a Single Source Using SYCL (Japanese only)” was published on this blog. That article contained information as of 2017, and the situation has changed somewhat as of 2023. Therefore, this article will provide an update on the new situation.
What is SYCL?
SYCL is a standard for handling various accelerators (GPUs, FPGAs, etc.) from a single C++ source. By using SYCL, you can write code for both the host and accelerators in C++17 without separating them into different files. It also has the advantage of a higher-level programming paradigm compared to CUDA or OpenCL, allowing you to omit descriptions of memory transfers between the host and device.
The latest version of the standard is SYCL 2020 (Revision 6).
Versions prior to SYCL 2020 (up to SYCL 1.2) were standards based on the premise of conversion to OpenCL. However, SYCL 2020 enabled the implementation of other backends, thereby expanding the range of supported accelerators.
SYCL Implementations
According to the Khronos SYCL Overview site (viewed 2023/01/09), the following implementations are available:
- Intel oneAPI Data Parallel C++ (DPC++)
- hipSYCL (Note)
- triSYCL
- neoSYCL
- Codeplay ComputeCpp
Note: In February 2023, hipSYCL was renamed to Open SYCL. Since there are no changes to the content, this article will refer to it by its former name, hipSYCL.
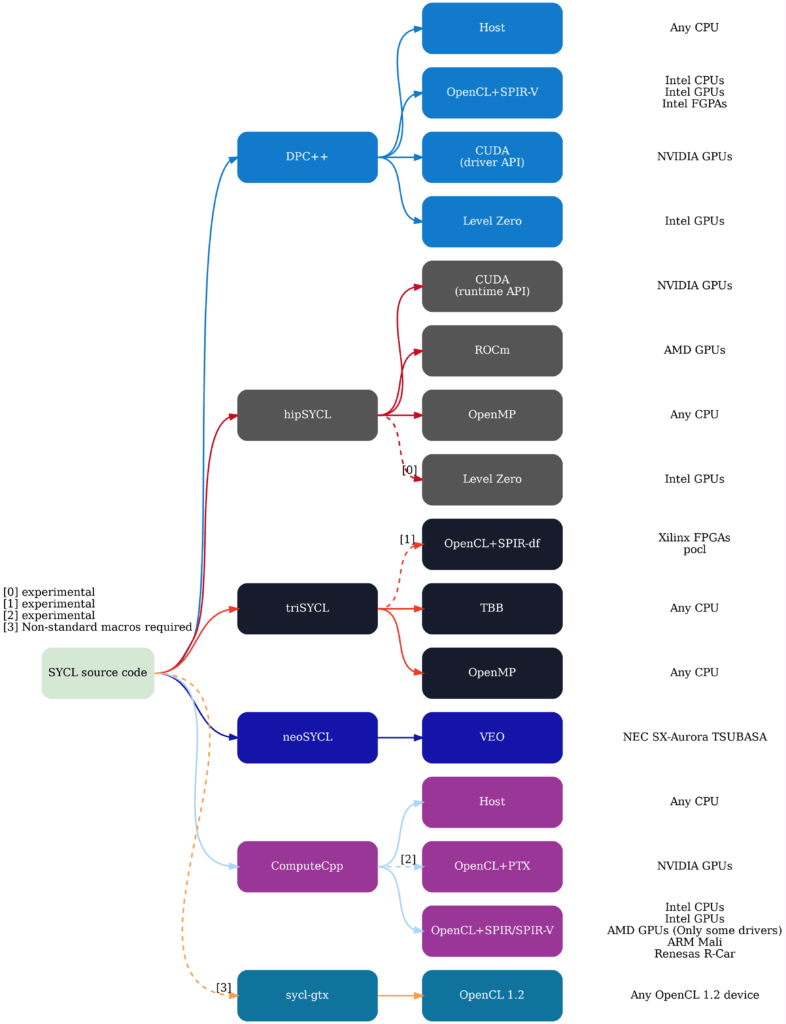
For a list of backends and accelerators supported by each implementation, the diagram in the hipSYCL repository documentation is easy to understand. It is quoted below.
In this article, we will introduce how to use two implementations that are candidates when targeting NVIDIA GPUs:
- Intel oneAPI Data Parallel C++ (DPC++)
- hipSYCL
and compare their speeds.
Setting up a SYCL environment for NVIDIA GPUs is more complex than setting up CUDA or OpenCL environments. We hope this will help readers when they try SYCL.
Experimental Environment
- OS: Ubuntu 20.04.5 LTS
- GPU: NVIDIA TITAN V (Volta)
- CUDA 11.6
Setting up Intel oneAPI Data Parallel C++ (DPC++) Environment
This section introduces the procedure for using Intel oneAPI Data Parallel C++ (DPC++) with an NVIDIA GPU.
Note: In mid-December 2022, it was announced with the release of oneAPI 2023.0 that oneAPI now supports plugins for NVIDIA and AMD GPUs. This content is not reflected in this article.
Obtaining and Building the Compiler
While oneAPI DPC++ can be installed using package systems like apt, prior to oneAPI 2023.0, NVIDIA GPU support was only available in the version published on GitHub. To use the GitHub version of DPC++, you first need to build the DPC++ compiler.
The procedure for building the compiler is shown in “Build DPC++ toolchain with support for NVIDIA CUDA,” but here is a summary:
- Install “Prerequisites” (Git, CMake, Python, Ninja, GCC).
- Install CUDA 11.6.
- Create a working directory and clone the repository.
$ export DPCPP_HOME=~/sycl_workspace
$ mkdir $DPCPP_HOME
$ cd $DPCPP_HOME
$ git clone https://github.com/intel/llvm -b sycl
- Build with the –cuda option.
$ python $DPCPP_HOME/llvm/buildbot/configure.py --cuda
$ python $DPCPP_HOME/llvm/buildbot/compile.py
- Confirm that the build is complete and
$DPCPP_HOME/llvm/build/bin/clang++has been generated.
Confirming Correct Device Recognition
Run the following sample code to display the device name and vendor name.
Success is indicated if the name of the desired device is displayed. The environment for using DPC++ is now ready.
// show_names.cpp
#include <sycl/sycl.hpp>
#include <iostream>

int main() {
    // Select GPU from available devices
    auto device = sycl::device(sycl::gpu_selector_v);
    // Get and display device name and vendor name
    std::cout << "Device Name: " << device.get_info<sycl::info::device::name>() << std::endl;
    std::cout << "Device Vendor: " << device.get_info<sycl::info::device::vendor>() << std::endl;
}
# Compile
$ $DPCPP_HOME/llvm/build/bin/clang++ show_names.cpp -fsycl -fsycl-targets=nvptx64-nvidia-cuda -o show_names
# Execute (add llvm/build/lib to library search path for dynamic linking)
$ LD_LIBRARY_PATH="$DPCPP_HOME/llvm/build/lib:${LD_LIBRARY_PATH:-}" ./show_names
Device Name: NVIDIA TITAN V
Device Vendor: NVIDIA CorporationSetting up hipSYCL Environment
This section introduces the procedure for using hipSYCL (Open SYCL) with an NVIDIA GPU.
Obtaining and Building LLVM/clang and hipSYCL Compilers
The procedures are shown in “Building and installing hipSYCL” and “hipSYCL installation instructions for CUDA,” but here is a summary:
- Install “Software Dependencies” (Python3, CMake, boost).
- Install CUDA 11.6.
- Build LLVM/clang 14 with CUDA (NVPTX) support enabled.
- Refer to “Building LLVM with CMake” for LLVM/clang build methods.
- To enable CUDA (NVPTX) support, add
-D LLVM_TARGETS_TO_BUILD="X86;NVPTX"during configuration.
- Clone the hipSYCL repository.
$ git clone https://github.com/illuhad/hipSYCL $ cd hipSYCL - Build hipSYCL.
$ mkdir build $ cd build $ cmake -DCMAKE_INSTALL_PREFIX=$HOME/local -DCUDA_TOOLKIT_ROOT_DIR=/usr/local/cuda -DWITH_CUDA_BACKEND=ON -DBOOST_ROOT=/usr/include/boost .. $ make install - Confirm that
$HOME/local/bin/syclcchas been installed.
Confirming Correct Device Recognition
Run the following sample code to display the device name and vendor name.
Success is indicated if the name of the desired device is displayed. The environment for using hipSYCL is now ready.
// show_names.cpp (same code as for DPC++ environment setup)
#include <sycl/sycl.hpp>
#include <iostream>

int main() {
    // Select GPU from available devices
    auto device = sycl::device(sycl::gpu_selector_v);
    // Get and display device name and vendor name
    std::cout << "Device Name: " << device.get_info<sycl::info::device::name>() << std::endl;
    std::cout << "Device Vendor: " << device.get_info<sycl::info::device::vendor>() << std::endl;
}
# Specify the directory where LLVM/clang 14 was installed when running syclcc
$ CLANG_ROOT=/opt/llvm-14/llvm-project/build/
# Build
$ syclcc -O2 --hipsycl-targets='cuda:sm_70' --hipsycl-clang=$CLANG_ROOT/bin/clang++ --hipsycl-clang-include-path=$CLANG_ROOT/lib/clang/14.0.6 show_names.cpp -o show_names
$ ./show_names
Device Name: NVIDIA TITAN V
Device Vendor: NVIDIAPerformance Comparison
In this section, we will implement simple image processing and compare the speeds of the two implementations (oneAPI DPC++, hipSYCL).
The image processing task will be a convolution operation.
A straightforward implementation using SYCL would look like the following code. Details of SYCL usage are not covered in this article.
#include <cassert>
#include <iostream>
#include <sycl/sycl.hpp>
#include <opencv2/core/core.hpp>

void convolution2d(const cv::Mat& src, cv::Mat& dst, const cv::Mat& kernel)
{
    using inputType = std::uint8_t;
    assert(src.type() == CV_8UC1);
    assert(src.type() == dst.type());

    using kernelType = float;
    assert(kernel.type() == CV_32FC1);

    const int halfSize = kernel.cols / 2;

    // Select GPU from available devices
    auto device = sycl::device(sycl::gpu_selector_v);
    // Create a queue with profiling (time recording) enabled
    auto q = sycl::queue{device, sycl::property::queue::enable_profiling{}};

    // Define ranges and buffer objects for the images
    const auto srcRows = src.rows;
    const auto srcCols = src.cols;
    const auto srcRange = sycl::range<2>{
        static_cast<std::size_t>(srcRows), static_cast<std::size_t>(srcCols)
    };
    auto bufferSrc = sycl::buffer<inputType, 2>{
        src.ptr<inputType>(), srcRange
    };
    auto bufferDst = sycl::buffer<inputType, 2>{
        dst.ptr<inputType>(),
        sycl::range<2>{static_cast<std::size_t>(dst.rows), static_cast<std::size_t>(dst.cols)}
    };
    auto bufferKernel = sycl::buffer<kernelType, 2>{
        kernel.ptr<kernelType>(),
        sycl::range<2>{static_cast<std::size_t>(kernel.rows), static_cast<std::size_t>(kernel.cols)}
    };

    // Submit a function to the queue
    auto ev = q.submit([&](sycl::handler& cgh){
        auto accessorSrc = bufferSrc.get_access<sycl::access_mode::read>(cgh);
        auto accessorDst = bufferDst.get_access<sycl::access_mode::write>(cgh);
        auto accessorKernel = bufferKernel.get_access<sycl::access_mode::read>(cgh);

        cgh.parallel_for(
            srcRange,
            [accessorSrc, accessorDst, accessorKernel, halfSize, srcRows, srcCols](sycl::item<2> it) {
                float sum = 0.0f;
                const auto y = it.get_id(0);
                const auto x = it.get_id(1);
                // Skip computation for image borders
                if (   y < halfSize || y >= (srcRows - halfSize)
                    || x < halfSize || x >= (srcCols - halfSize)) {
                    return;
                }
                // Calculate convolution
                for (int dy = -halfSize; dy <= halfSize; dy++) {
                    for (int dx = -halfSize; dx <= halfSize; dx++) {
                        sum += accessorSrc[y + dy][x + dx] * accessorKernel[dy + halfSize][dx + halfSize];
                    }
                }
                // Write result to output image
                accessorDst[y][x] = sum;
            }
        );
    });

    // Get and display computation start and end times
    const auto startTime =
        ev.get_profiling_info<sycl::info::event_profiling::command_start>();
    const auto endTime =
        ev.get_profiling_info<sycl::info::event_profiling::command_end>();
    std::cout << startTime << ";" << endTime << std::endl;
}

int main() {
    constexpr int width = 512;
    constexpr int height = 512;
    constexpr int kernelSize = 3;
    cv::Mat src{height, width, CV_8UC1};
    cv::Mat dst{height, width, CV_8UC1};
    cv::Mat kernel{kernelSize, kernelSize, CV_32FC1};
    // Set image and kernel contents here (omitted)
    convolution2d(src, dst, kernel);
}
Even for a somewhat complex process like convolution, we can easily develop a single piece of code that returns the same result with two different implementations.
This code uses SYCL’s profiling feature to display the start and end times of the computation.
The table below shows the results of running with various image and kernel sizes. The number of executions for statistics was 20, and the first run was excluded because it included SYCL runtime initialization (about 10 µs for DPC++, about 1 ms for hipSYCL). Results are shown with 2 significant figures.
| Image Size | Kernel Size | DPC++ Median (µs) | DPC++ Deviation (µs) | DPC++ Throughput (GFLOPS) | hipSYCL Median (µs) | hipSYCL Deviation (µs) | hipSYCL Throughput (GFLOPS) |
| 512×512 | 3×3 | 11 | 0.16 | 400 | 29 | 1.7 | 160 |
| 512×512 | 9×9 | 43 | 0.46 | 980 | 58 | 0.93 | 720 |
| 2048×2048 | 3×3 | 110 | 1.0 | 630 | 110 | 5.4 | 650 |
| 2048×2048 | 9×9 | 550 | 3.4 | 1200 | 540 | 1.4 | 1300 |
Looking at the Throughput, we can see the following:
- For 512×512 images, DPC++ is faster for both kernel sizes (1.3 to 2.5 times).
- For 2048×2048 images, DPC++ and hipSYCL are equally fast.
Summary
In this article, we did the following:
- Introduced the procedure for using Intel oneAPI DPC++ with NVIDIA GPUs.
- Introduced the procedure for using hipSYCL with NVIDIA GPUs.
- Implemented convolution in SYCL and compared the speeds achieved on the same GPU.
- DPC++ had an advantage when the problem size was small, but there was no significant difference when the problem size was increased.