
* This blog post is an English translation of an article originally published in Japanese on January 27, 2023.
Introduction
Recently, Livox released a new 3D LiDAR, the Mid-360, with a 40m range.
A complete set can be purchased for approximately 100,000 JPY (as of January 2023).[1]
[1] This article was originally written in 2023, and the information presented reflects the context of that time.
Its field of view (FOV) is also distinctive at 360° x 59° (vertical), and we anticipate it can be used in ways that differentiate it from Velodyne and similar LiDARs.
- Mid-360: https://store.dji.com/product/livox-mid-360
- Dedicated cable: https://store.dji.com/product/livox-three-wire-aviation-connector (Not required if you make your own)
At our company, we promptly acquired one and tried running it with ROS1/ROS2.
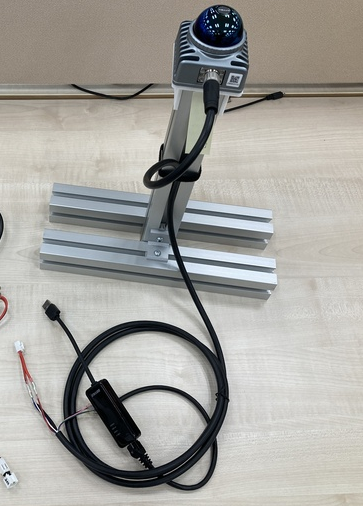
* Our custom-made cable was made based on the pin assignments in the Mid-360 Quick Start Guide.
Test Environment
The environment used for operational verification is as follows:
- ROS1
- Ubuntu 18.04
- Melodic (desktop full)
- ROS2
- Ubuntu 22.04
- Humble (desktop full)
- Livox-SDK2: v1.0.1
- livox_ros_driver2: v1.1.1
Network Configuration (Common for ROS1/ROS2)
(Mid-360 Quick Start Guide p.6, 2024/04/25)
The Livox Mid-360 supports only the static IP address mode. All Livox Mid-360 LiDAR sensors are set to static IP address mode by default with an IP address of 192.168.1.1XX (XX stands for the last two digits of the Livox Mid-360 LiDAR sensor’s serial number). The default subnet masks of the Livox Mid-360 LiDAR sensors are all 255.255.255.0 and their default gateways are 192.168.1.1. Directly connect the Livox Mid360 to the computer when using for the first time.
According to the official Quick Start Guide available here, the Mid-360 is set to an IP address of 192.168.1.1XX/24, where XX corresponds to the last two digits of its serial number. The last two digits of our Mid-360’s serial number were 02, so its IP address is 192.168.1.102/24.
In this article, the host PC is configured with the IP address 192.168.1.200/24. With this setup, we ping 192.168.1.102 to confirm a response.
$ ip a
≪Omitted≫
3: enx9096f34afb12: <BROADCAST,MULTICAST,UP,LOWER_UP> mtu 1500 qdisc fq_codel state UP group default qlen 1000
    link/ether 90:96:f3:4a:fb:12 brd ff:ff:ff:ff:ff:ff
    inet 192.168.1.200/24 brd 192.168.1.255 scope global noprefixroute enx9096f34afb12
       valid_lft forever preferred_lft forever
    inet6 fe80::1b9b:8384:3f4c:46c9/64 scope link noprefixroute
       valid_lft forever preferred_lft forever
≪Omitted≫
$ ping 192.168.1.102
PING 192.168.1.102 (192.168.1.102) 56(84) bytes of data.
64 bytes from 192.168.1.102: icmp_seq=1 ttl=255 time=3.05 ms
64 bytes from 192.168.1.102: icmp_seq=2 ttl=255 time=1.88 ms
64 bytes from 192.168.1.102: icmp_seq=3 ttl=255 time=0.642 ms
To get the Mid-360 running, we will first install the Livox LiDAR SDK (Livox_SDK2) and verify its operation.
After that, we will install the ROS driver, livox_ros_driver2, to visualize the point cloud in ROS1/ROS2.
Livox_SDK2 Installation (Common for ROS1/ROS2)
Livox_SDK2 Build and Installation
Install Livox SDK2 according to its README.
$ cd $HOME
$ git clone https://github.com/Livox-SDK/Livox-SDK2 -b 1.0.1
$ cd $HOME/Livox-SDK2/ && mkdir build && cd build
$ cmake .. && make -j
$ sudo make install
Addendum: Currently, Livox-SDK2 v1.0.1 is no longer available. Please check here and use an available version.
Livox_SDK2 Operational Check
We will use the sample program livox_lidar_quick_start to check if communication with the Mid-360 via Livox_SDK2 is possible.
In the default configuration file, the host PC’s IP address is 192.168.1.5.
Therefore, we will modify the configuration file to match our environment.
$ sed -i "s/192.168.1.5/192.168.1.200/g" $HOME/Livox-SDK2/samples/livox_lidar_quick_start/mid360_config.jsondiff --git a/samples/livox_lidar_quick_start/mid360_config.json b/samples/livox_lidar_quick_start/mid360_config.json
index e203497..07620db 100644
--- a/samples/livox_lidar_quick_start/mid360_config.json
+++ b/samples/livox_lidar_quick_start/mid360_config.json
@@ -8,15 +8,15 @@
"log_data_port": 56500
},
"host_net_info" : {
- "cmd_data_ip" : "192.168.1.5",
+ "cmd_data_ip" : "192.168.1.200",
"cmd_data_port": 56101,
- "push_msg_ip": "192.168.1.5",
+ "push_msg_ip": "192.168.1.200",
"push_msg_port": 56201,
- "point_data_ip": "192.168.1.5",
+ "point_data_ip": "192.168.1.200",
"point_data_port": 56301,
- "imu_data_ip" : "192.168.1.5",
+ "imu_data_ip" : "192.168.1.200",
"imu_data_port": 56401,
- "log_data_ip" : "192.168.1.5",
+ "log_data_ip" : "192.168.1.200",
"log_data_port": 56501
}
}After completing the configuration, execute the following commands.
If the connection to the Mid-360 is successful and point cloud data is being acquired, then everything is fine.
$ cd $HOME/Livox-SDK2/build/samples/livox_lidar_quick_start/
$ ./livox_lidar_quick_start ../../../samples/livox_lidar_quick_start/mid360_config.json
[2023-01-20 12:02:04.520] [console] [info] Livox lidar logger disable.  [parse_cfg_file.cpp] [Parse] [84]
[2023-01-20 12:02:04.520] [console] [info] Data Handler Init Succ.  [data_handler.cpp] [Init] [49]
[2023-01-20 12:02:04.521] [console] [info] Init livox lidars succ.  [device_manager.cpp] [Init] [153]
[2023-01-20 12:02:04.523] [console] [info] Handle detection data, handle:1711384768, dev_type:9, sn:47MDKBV0010102, cmd_port:56100  [general_command_handler.cpp] [HandleDetectionData] [345]
point cloud handle: 1711384768, data_num: 96, data_type: 1, length: 1380, frame_counter: 0
point cloud handle: 1711384768, data_num: 96, data_type: 1, length: 1380, frame_counter: 0
point cloud handle: 1711384768, data_num: 96, data_type: 1, length: 1380, frame_counter: 0
point cloud handle: 1711384768, data_num: 96, data_type: 1, length: 1380, frame_counter: 0
[2023-01-20 12:02:04.525] [console] [info]  Receive Ack: Id 257 Seq 3  [mid360_command_handler.cpp] [Handle] [73]
[2023-01-20 12:02:04.525] [console] [info] Query Fw type succ, the fw_type:1  [general_command_handler.cpp] [QueryFwTypeCallback] [489]
point cloud handle: 1711384768, data_num: 96, data_type: 1, length: 1380, frame_counter: 0
≪Omitted≫
livox_ros_driver2 Installation
According to the livox_ros_driver2 README, we will use the build.sh script within the package to build it.
livox_ros_driver2 is compatible with both ROS1 and ROS2. However, the detailed specifications differ for each environment, and attempting to build directly in the ROS workspace directory using catkin_make or colcon build without using build.sh will result in build failures, so be careful.
ROS1 Build
Addendum: ROS 1 (including its final distribution, Noetic) reached End-of-Life (EOL) in May 2025. Learn more.
For ROS1, you can build using the following commands:
$ mkdir $HOME/livox_ws/src -p && cd $HOME/livox_ws/src
$ git clone https://github.com/Livox-SDK/livox_ros_driver2 -b 1.1.1
$ cd livox_ros_driver2
$ ./build.sh ROS1
About the ROS1 Build Command
The default build command for livox_ros_driver2 in ROS1 is as follows:
catkin_make -DROS_EDITION=${VERSION_ROS1}ROS_EDITION is used within CMakeLists.txt to differentiate processing for ROS1 and ROS2.
Although no build mode is specified, CMAKE_BUILD_TYPE is set to Release here in CMakeLists.txt, so it automatically becomes a Release build.
ROS2 Build
For ROS2 Humble, you can build using the following commands:
$ mkdir $HOME/livox_ws/src -p && cd $HOME/livox_ws/src
$ git clone https://github.com/Livox-SDK/livox_ros_driver2 -b 1.1.1
$ cd livox_ros_driver2
$ ./build.sh humble
According to the README, if you are using a distro older than ROS2 Humble, execute ./build.sh ROS2.
It seems that due to changes in the rosidl_typesupport_cpp specification from ROS2 Humble, the process for creating custom messages is branched internally.
About the ROS2 Build Command
The default build command for livox_ros_driver2 in ROS2 is as follows:
colcon build --cmake-args -DROS_EDITION=${VERSION_ROS2} -DHUMBLE_ROS=${ROS_HUMBLE}Similar to the ROS1 build command, ROS_EDITION and HUMBLE_ROS are used for conditional processing within CMakeLists.txt.
However, unlike ROS1, there is no process to set the build mode within CMakeLists.txt, so it defaults to a Debug build.
Additionally, the --symlink-install option is not included, which means ./build.sh needs to be re-run every time you modify configs or launch files within the package.
Therefore, for livox_ros_driver2 v1.1.1 at least, it is recommended to modify the build command as follows:
colcon build --symlink-install --cmake-args -DCMAKE_BUILD_TYPE=Release -DROS_EDITION=${VERSION_ROS2} -DHUMBLE_ROS=${ROS_HUMBLE}Configuration File Update (Common for ROS1/ROS2)
Similar to the Livox_SDK2 operational check, update the startup configuration file to match your environment.
Update the IP addresses in livox_ros_driver2/config/MID360_config.json as follows:
# Update Host PC IP address
$ sed -i "s/192.168.1.5/192.168.1.200/g" $HOME/livox_ws/src/livox_ros_driver2/config/MID360_config.json
# Update Mid-360 IP address
$ sed -i "s/192.168.1.12/192.168.1.102/g" $HOME/livox_ws/src/livox_ros_driver2/config/MID360_config.json
diff --git a/config/MID360_config.json b/config/MID360_config.json
index e3df5d1..2218f3e 100644
--- a/config/MID360_config.json
+++ b/config/MID360_config.json
@@ -11,13 +11,13 @@
"log_data_port": 56500
},
"host_net_info" : {
- "cmd_data_ip" : "192.168.1.5",
+ "cmd_data_ip" : "192.168.1.200",
"cmd_data_port": 56101,
- "push_msg_ip": "192.168.1.5",
+ "push_msg_ip": "192.168.1.200",
"push_msg_port": 56201,
- "point_data_ip": "192.168.1.5",
+ "point_data_ip": "192.168.1.200",
"point_data_port": 56301,
- "imu_data_ip" : "192.168.1.5",
+ "imu_data_ip" : "192.168.1.200",
"imu_data_port": 56401,
"log_data_ip" : "",
"log_data_port": 56501
@@ -25,7 +25,7 @@
},
"lidar_configs" : [
{
- "ip" : "192.168.1.12",
+ "ip" : "192.168.1.102",
"pcl_data_type" : 1,* If you did not build with --symlink-install in ROS2 Humble, you will need to run ./build.sh humble again after making these changes.
Launching Mid-360 with ROS1/ROS2
You can launch the Mid-360 with ROS1 and ROS2 using the following commands, respectively.
ROS1
$ source $HOME/livox_ws/devel/setup.bash
$ roslaunch livox_ros_driver2 rviz_MID360.launch
ROS2
$ source $HOME/livox_ws/install/setup.bash
$ ros2 launch livox_ros_driver2 rviz_MID360_launch.py
After executing the command, we were able to visualize the Mid-360 point cloud in rviz.
It recognized desks and other objects in detail, and the overall precision seems good.
Checking the node information on ROS2, it appears the /livox/lidar topic is for point cloud data (sensor_msgs/msg/PointCloud2) and /livox/imu is for IMU data (sensor_msgs/msg/Imu).
They were being published at 10 Hz (default) and 200 Hz, respectively.
* The point cloud format and publishing frequency can be changed. See the Appendix below for details.
$ ros2 node info /livox_lidar_publisher
/livox_lidar_publisher
  Subscribers:
    /parameter_events: rcl_interfaces/msg/ParameterEvent
  Publishers:
    /livox/imu: sensor_msgs/msg/Imu
    /livox/lidar: sensor_msgs/msg/PointCloud2
    /parameter_events: rcl_interfaces/msg/ParameterEvent
    /rosout: rcl_interfaces/msg/Log
  Service Servers:
    /livox_lidar_publisher/describe_parameters: rcl_interfaces/srv/DescribeParameters
    /livox_lidar_publisher/get_parameter_types: rcl_interfaces/srv/GetParameterTypes
    /livox_lidar_publisher/get_parameters: rcl_interfaces/srv/GetParameters
    /livox_lidar_publisher/list_parameters: rcl_interfaces/srv/ListParameters
    /livox_lidar_publisher/set_parameters: rcl_interfaces/srv/SetParameters
    /livox_lidar_publisher/set_parameters_atomically: rcl_interfaces/srv/SetParametersAtomically
  Service Clients:
  Action Servers:
  Action Clients:

$ ros2 topic hz /livox/lidar
average rate: 10.075
    min: 0.092s max: 0.109s std dev: 0.00472s window: 12
average rate: 10.037
    min: 0.092s max: 0.109s std dev: 0.00471s window: 22

$ ros2 topic hz /livox/imu
average rate: 200.061
    min: 0.004s max: 0.006s std dev: 0.00056s window: 202
average rate: 200.019
    min: 0.004s max: 0.006s std dev: 0.00057s window: 402
Future Plans
In the future, we plan to try performing SLAM using the Mid-360.
Appendix
If liblivox_lidar_sdk_shared.so is not found when running a ROS node
When running a node, you might encounter an error like the following, where liblivox_lidar_sdk_shared.so cannot be found:
[livox_ros_driver2_node-1] terminate called after throwing an instance of 'class_loader::LibraryLoadException'
[livox_ros_driver2_node-1]   what():  Could not load library dlopen error: liblivox_lidar_sdk_shared.so: cannot open shared object file: No such file or directory, at ./src/shared_library.c:99
In such cases, updating the library cache with ldconfig will resolve the issue.
$ sudo ldconfigAbout Mid-360 Point Cloud Format
The Mid-360 can also publish point cloud data in a custom format, livox_ros_driver2/msg/CustomMsg.
According to README#32-livox-ros-driver-2-internal-main-parameter-configuration-instructions, you can change the published message type by modifying the xfer_format parameter in each launch file.
Reference: For ROS2, change it as follows:
diff --git a/launch_ROS2/rviz_MID360_launch.py b/launch_ROS2/rviz_MID360_launch.py
index 31d3480..3e85a55 100644
--- a/launch_ROS2/rviz_MID360_launch.py
+++ b/launch_ROS2/rviz_MID360_launch.py
@@ -5,7 +5,7 @@ from launch_ros.actions import Node
 import launch


 ################### user configure parameters for ros2 start ###################
-xfer_format   = 0    # 0-Pointcloud2(PointXYZRTL), 1-customized pointcloud format
+xfer_format   = 1    # 0-Pointcloud2(PointXYZRTL), 1-customized pointcloud format
 multi_topic   = 0    # 0-All LiDARs share the same topic, 1-One LiDAR one topic
 data_src      = 0    # 0-lidar, others-Invalid data src
 publish_freq  = 10.0 # freqency of publish, 5.0, 10.0, 20.0, 50.0, etc.
$ ros2 topic info /livox/lidar
Type: livox_ros_driver2/msg/CustomMsg
Publisher count: 1
Subscription count: 0About Mid-360 Publishing Frequency
According to the specifications sheet, the Mid-360’s publishing frequency is 10 Hz (typical).
However, looking at README#32-livox-ros-driver-2-internal-main-parameter-configuration-instructions again, it seems you can set it up to a maximum of 100 Hz by changing the publish_freq parameter in each launch file.
Reference: For ROS2, change it as follows:
diff --git a/launch_ROS2/rviz_MID360_launch.py b/launch_ROS2/rviz_MID360_launch.py
index 31d3480..f8567e3 100644
--- a/launch_ROS2/rviz_MID360_launch.py
+++ b/launch_ROS2/rviz_MID360_launch.py
@@ -8,7 +8,7 @@ import launch
 xfer_format   = 0    # 0-Pointcloud2(PointXYZRTL), 1-customized pointcloud format
 multi_topic   = 0    # 0-All LiDARs share the same topic, 1-One LiDAR one topic
 data_src      = 0    # 0-lidar, others-Invalid data src
-publish_freq  = 10.0 # freqency of publish, 5.0, 10.0, 20.0, 50.0, etc.
+publish_freq  = 100.0 # freqency of publish, 5.0, 10.0, 20.0, 50.0, etc.
 output_type   = 0
 frame_id      = 'livox_frame'
 lvx_file_path = '/home/livox/livox_test.lvx'
$ ros2 topic hz /livox/lidar
average rate: 100.017
min: 0.009s max: 0.011s std dev: 0.00027s window: 102
average rate: 100.018
min: 0.009s max: 0.011s std dev: 0.00027s window: 203
average rate: 100.019
min: 0.009s max: 0.011s std dev: 0.00027s window: 304